JPEG Repair Shop allows you to repair corrupt JPEG files by manipulating the internal structure of the JPEG file. This makes it possible to repair corrupt files, which would be impossible to fix in a normal image editor.
How does it work
Download
Instructions
Troubleshooting
Contact
The image data of JPEG is divided into small rectangular areas called MCUs (Minimum Coded Unit) which are encoded together. Because of the way JPEG files are compressed an error in an MCU is likely to be propagated to the remaining image data, either displacing the image or changing the colors. JPEG Repair Shop allows you to delete and insert MCUs and to automatically fix color errors.
Watch a demonstration of the program on a corrupt JPEG image below:
For comparison you can download the original, the corrupted and the repaired image below:
If one looks at the repaired image by itself it is hard to notice that the image was ever corrupted, however when one switches between the original image and the repaired image quickly, some minor differences can be noticed. This is expected since image data was actually damaged.
Disclaimer: JPEG Repair Shop is still in early development, and I do not take any responsibility for damages to your files. I recommend that you make a backup of your files before attempting to repair them with this application.
For the best results you should use the original files right after they were corrupted. Using other programs to manipulate the images or uploading them to social media might result in the data being recompressed, which can make it impossible for JPEG Repair Shop to repair them.
JPEG Repair Shop for WindowsTo run the program unpack the archive and run JRS.exe. Versions for other platforms are planned for the future, but currently I only have a Windows machine available to build and test the application on.
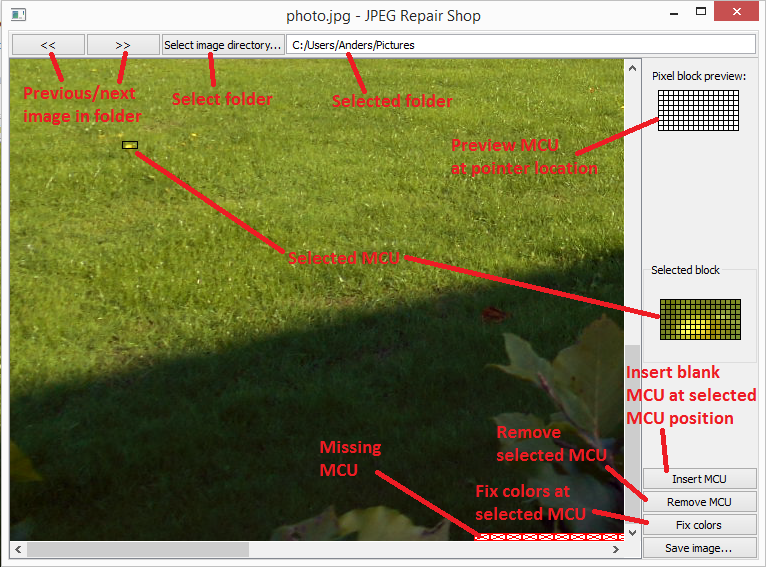
Select the folder that contains your images by clicking 'Select image directory...' and browse to the image you want to repair using the '<<' (previous image) and '>>' (next image) buttons.
Then you select the MCU you want to work at using the mouse. To the right you can see a preview of the MCU under the mousepointer and the selected MCU.
To repair the image you use the tools at the bottom right. 'Insert MCU' adds a blank MCU at the currently selected MCU, 'Remove MCU' removes the selected MCU, and 'Fix colors' tries to repair color errors starting at the selected MCU. To repair the colors you should select the first MCU that has color errors. 'Fix colors' works better when the line where the color errors begin is aligned with the line before, so if you need to add or delete MCUs you should do that before using the 'Fix color'-tool.
When you are done repairing your image, you press 'Save image...' to select a location to save your repaired image.
Step-by-step instructions on how to repair a corrupt JPEG file can be found here
The program crashes!
The colors are still noticeably different after using 'Fix colors'
I get an error: "Cannot load file. Corrupt header."
I get an error: "Cannot load file. No data in file."
I get an error: "Cannot load file. Unsupported marker: X"
I get an error: "Cannot load file. JPEG type not supported"
If you can consistently reproduce the error, and you are willing to share the image that causes the crash, then please contact me, and I will try to fix the bug. Images shared with me will of course only be used for debugging and will be deleted afterwards.
The program will analyse the image and try to guess the best colors. In most cases this works really well, but in some corner cases there will be a noticeably difference in the colors. I plan to add a manual control for adjusting the colors in a future release, but until then the only solution I can think of is to try to adjust the colors manually in a photo editor.